![]()
![]()
26th December 2003 Ian Wells
WinCVS is a comprehensive client for CVS,
an alternative to TortoiseCVS which I currently use.
There is extensive documentation for WinCVS, of variable quality.
This HowTo details one way to reach a working set-up with WinCVS Version 1.3b13.
It relies on having PuTTY
working to access the CVS server over SSH.
Some comparison tools are useful when using CVS to see differences between files and directories.
Install WinCVS with the default options, and it is likely to inform you that it requires Python for the macros. It is possible to use WinCVS for basic use without Python, so it is not considered further here, although it was easy to install.
|
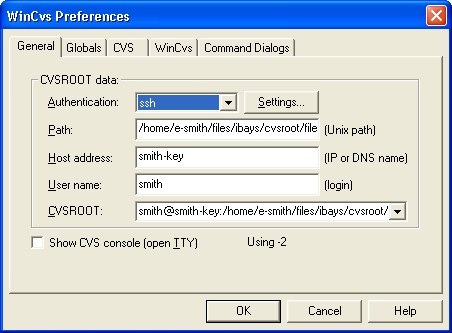
When starting WinCVS for the first time the Preferences window appears. General Tab This is where you enter the information about your CVS server. Authentication: SSH the secure shell should be used. Path: The full path to the CVS repository on the server. Host-address: Pageant session name. This HowTo requires the use of a Pageant saved session, as I have found this to be the most reliable way. The session name must be one word, not a phrase. User name: The user must exist on the CVS server. |
 |
|
|
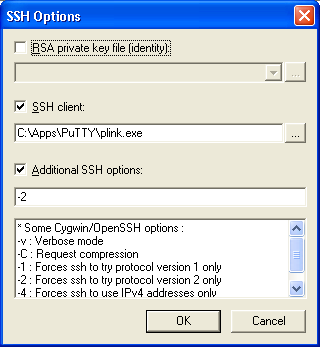
SSH Options from General Tab SSH client: The path to the plink executable. Additional SSH options: Force SSH version 2 protocol to be used. CVS Tab (not shown) Home: Select a HOME directory to be used, eg c:\temp WinCVS Tab (not shown) Select the diff application to be used |
 |
Once these settings have been entered it should now be possible to start using WinCVS. You may want to read the WinCvs -- Daily Use Guide
Copyright © 2003
Ian Wells : The original can be found from http://www.wellsi.com/sme
: Please send additions & corrections to me.
Permission
is granted to copy, distribute and/or modify this document under the
terms of the GNU Free Documentation License, Version 1.2 or any later
version published by the Free Software Foundation; with no Invariant
Sections, no Front-Cover Text and no Back-Cover Text. A copy of the
GNU Free Documentation License is available from the Free Software
Foundation at http://www.fsf.org/copyleft/fdl.html.